
For our standard wooden floors, we dig foundational holes, fill them with 2 1/2" to 3 1/2" of crushed gravel, and set 8"x8" cinder blocks on top. For specific surfaces and in some situations, we may use 12"x12"x2" concrete pavers in place of cinder blocks or a blend of both.
Click here to see a 3D model of how the wooden floor foundation is installed.

The Framing:
Our standard builds feature 2"x6" pressure-treated floor joists set at 24" centers, topped with 5/8” OSB tongue-and-groove sheathing.
Need more strength? We offer upgrades to 16" or 12" centers, 2"x8" joists, and pressure-treated plywood (5/8” or 3/4”) for heavy-duty storage.

The Finish:
We include professional leveling and squaring with every installation. Once the foundation is set, we use the excess dirt to backfill around the blocks and tuck the remainder under the shed to keep your yard looking clean and professional.

Existing Concrete Pad:
If you already have a concrete pad, we use a 2"x4" pressure-treated bottom plate secured with Tapcon anchors, allowing you to use the concrete itself as your interior floor. It is critical that your concrete pad is both level and square in order to use the concrete as the floor. Please see the FAQ for our recommended concrete pad sizes.

Why gaps occur: The height of your shed relative to the ground depends entirely on the slope of your site. We prioritize building a perfectly level shed, which means:
Level Sites: The flatter the area, the closer the 2"x6" pressure-treated base frame will sit to the ground.
Sloped Sites: On steeper slopes (up to 8"), a gap will naturally be created on the "downhill" side as we level the structure.
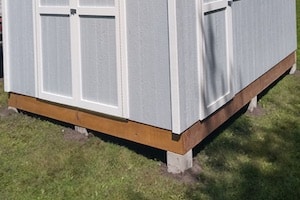
Visual and Protective Solutions: If you prefer to have this space closed off for aesthetic reasons or to deter critters, we offer a Fence Lattice Skirt construction upgrade. This skirting neatly covers the gap between the base frame and the ground, providing a finished look to your installation.

Can you install my shed on a concrete pad? Yes. We can install any of our sheds on a pre-existing concrete pad. Please note that while we install the shed, we do not pour concrete pads. You will need to have this completed by a local contractor or use an existing pad that meets our requirements.
How the Installation Works: When installing on concrete, the pad itself becomes the interior floor of your shed. We secure the structure using an outer 2"x4" pressure-treated base frame, which is anchored directly into your concrete pad using Tapcon Concrete Anchors.
Key Requirements for Your Pad: To ensure a proper build, your pad must be:
Perfectly Level: Many contractors naturally add a slight slope to concrete for drainage. It is crucial to instruct your contractor that the pad must be perfectly level with no slope.
Square: The pad must be perfectly square to allow the wall panels to align correctly.
How to Verify Your Pad: You can verify the pad is level using a standard bubble level. To check if it is square, measure the pad diagonally from corner to corner; the two measurements should be identical. If you have questions about your site, please feel free to contact us for assistance.
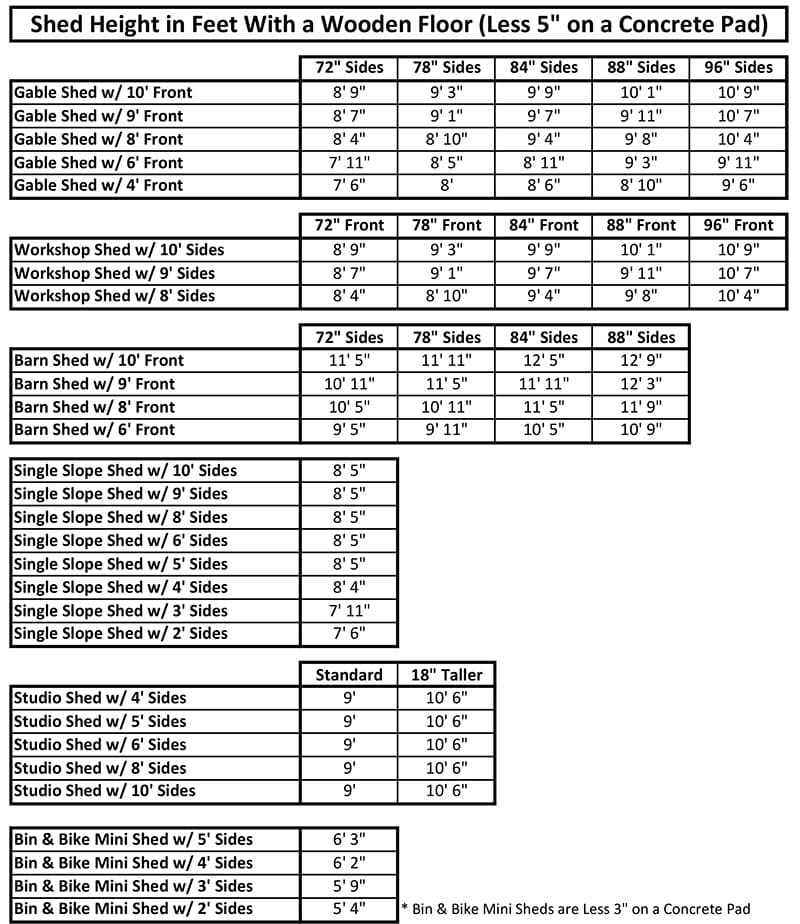
Recommended Pad Sizes: Please refer to the charts below for the exact dimensions required for your specific shed model:


All of our sheds do require painting. Many customers choose to paint their sheds themselves, or we offer a panting service to pre-paint the shed before delivery or installation. Because the engineered wood panels we use for our sheds come factory primed our sheds can not be stained and must be painted. If painting the shed yourself we recommend using Sherwin Williams Emerald Rain Refresh Premium Exterior Paint. It features a self-cleaning technology that helps dirt and debris wash away upon contact with rain or water, reducing the need for frequent cleaning. This helps to ensure a flattering finish and seals the wood. Any premium exterior latex paint will also work.

We offer a full shed painting service with your choice of paint colour. You can also choose to have the trim painted in white
or the colour of your choice. We have a selection of 10 of our most popular colours to choose from or you can choose any custom colour for an additional fee. All of our walls are pre-painted in our controlled shop environment and we complete touch ups on site as needed. We also leave you with some touch up paint.
If you have any hidden walls that will be obstructed and inaccessible after the shed is installed we can paint them for you. We offer to paint 1, 2 or 3 hidden walls. This is a more cost effective way to get the walls that will be hidden painted ahead of time if you will not be able to access them once the shed is installed. You can then paint the remaining walls at your convenience.
We use top quality Sherwin Williams Emerald Rain Defense premium exterior paint in satin finish paint for our sheds. Paint is a separate fee from the painting labour and will be added to your quote at a discounted price of $85 per gallon. Most sheds will require 2 gallons and if the trim is painted, a separate gallon for the trim. All adjustments will be made on the quote we email to you.
Available Colours:


Standard Colour Choice:
The following are our standard choices for painting your shed.
Custom Colour Choice:
If you have chosen to pay the additional fee for a custom wall and/or trim colour you can select you can select any exterior colour of Sherwin Williams paint. You may choose a colour in person at a Sherwin Williams store or via Sherwin Williams website. Sherwin Williams can also match most other paint company colours, just let us know what manufacturer and code you would like to use and
we can find out if it will work for your shed.
To find a Sherwin Williams location nearest you please visit this link here:
www.sherwin-williams.com/en-ca/find-a-store
Sherwin Williams online paint colour selections link here:
www.sherwin-williams.com/en-ca/colour#/en-ca/colour
We provide delivery of our Do It Yourself Shed Kits and Installations to the following locations and their surrounding areas:
Acton +$190
Ajax +$220
Alliston +$265
Ancaster +$115
Angus +$275
Apsley +$450
Arthur +$220
Aurora +$220
Ayr +$155
Barrie +$270
Beamsville +$155
Beaverton +$310
Belleville +$480
Binbrook +$145
Blue Mountains +$350
Bobcaygeon +$395
Bolton +$205
Bowmanville +$290
Bracebridge +$385
Bradford +$240
Brampton +$150
Brantford +$140
Burford +$140
Burks Falls +$480
Burlington +$115
Caledon +$185
Caledonia +$155
Cambridge +$145
Cayuga +$190
Chatham +$420
Cobourg +$360
Collingwood +$335
Craighurst +$300
Creemore +$275
Delhi +$220
Dundas +$95
Dunnville +$240
Elmira +$240
Elora +$240
Erin +$185
Fergus +$190
Fonthill +$210
Fort Erie +$240
Georgetown +$170
Georgina +$290
Goderich +$390
Grafton +$390
Grand Bend +$380
Gravenhurst +$350
Grimsby +$145
Guelph +$155
Hagersville +$190
Haliburton – Dorset +$445
Haliburton – Kinmount +$410
Haliburton – Minden +$430
Haliburton – Tory Hill +$480
Haliburton -Town of- +$430
Hamilton +$115
Hanover +$340
Hastings +$420
Honey Harbour +$335
Huntsville +$440
Ingersol +$205
Innisfil +$245
Kawartha Lakes +$410
Keswick +$290
Kincardine +$410
King City +$210
Kingston +$540
Kingsville +$480
Kirkfield +$335
Kitchener +$160
Lambton Shores +$380
Lindsay +$325
Listowel +$250
Little Britain +$305
London +$220
Madoc +$470
Markham +$200
Midland +$325
Milton +$130
Mississauga +$145
Mount Forest +$240
Nanticoke +$265
Newcastle +$310
New Hamburg +$220
New Tecumseh +$265
Newmarket +$230
Niagara Falls +$190
Niagara-on-the-Lake +$190
Nobelton +$205
Oakville +$130
Orangeville +$210
Orillia +$290
Oro-Medonte +$270
Oshawa +$235
Oshweken +$150
Owen Sound +$455
Paris +$145
Parry Sound +$410
Peterborough +$380
Pickering +$210
Port Colborne +$235
Port Dover +$235
Port Hope +$350
Port Maitland +$265
Port Rowan +$270
Port Stanley +$290
Port Severn +$325
Richmond Hill +$200
Sarnia +$430
Sauble Beach +$475
Severn Falls +$340
Shelbourne +$235
Simcoe +$210
Smithville +$160
Southampton +$455
St. Jacobs +$205
St. Thomas +$265
St. Catharines +$180
Stayner +$310
Stoney Creek +$120
Stratford +$260
Strathroy +$260
Tilbury +$430
Tillsonburg +$230
Tiny +$330
Toronto East (DVP) +$180
Toronto West (DVP) +$170
Tottenham +$220
Trenton +$445
Turkey Point +$235
Uxbridge +$290
Vaughan +$200
Walkerton +$355
Wasaga Beach +$310
Washago +$310
Waterdown +$115
Waterloo +$175
Welland +$220
Whitby +$230
Whitechurch-Stouffville +$250
Windsor +$445
Wingham +$320
Woodbridge +$200
Woodstock +$185
Upon ordering your shed we require a 50% deposit. We accept: Interac e-Transfer, online bill payments, credit card, cash or cheque.
INTERAC e-TRANSFER
(quickest & most popular option): We accept from all Canadian banks to our email address: sales@shedinaday.com; simply use your quote number as the security question and for the answer use your 8 digit account number located at the top right of your quote. When paying deposits through Email Money Transfer, if the amount is over your daily limit, deposit can be paid over multiple days.
ONLINE BILL PAYMENTS
(payment received within 1-2 business days): We accept from: TD, Scotiabank or RBC; simply add, “Shed In A Day” as the payee and use your 8 digit account number located at the top right of your quote.
CREDIT CARD
We accept credit cards via phone or in person from: Visa, Mastercard, or Amex. Please note that this method has an extra 2.8% convenience fee.
CHEQUE
For cheque payments please make the cheque out to “Shed In A Day Limited”. Cheques can be dropped off Monday to Friday 8:30am to 4:30pm or mailed to our office at 62 Head Street, Unit 3, Dundas, ON, L9H 3H7.
Pathway Requirements: To ensure a smooth delivery and installation, we need a clear path from our parked truck to your build site. Because we carry our pre-built wall sections vertically, your pathway must meet the following minimum clearances:
Width: At least 2 feet of horizontal clearance.
Height: At least 8 feet of vertical clearance.
Common Obstacles: Please ensure the path is clear of debris and consider the following:
Gates & Headers: Ensure all gates are at least 2 feet wide.
The "Topper" Rule: If your gate has a "header" or "topper" (a crossbeam at the top), the clearance underneath must be at least 8 feet. If you have a topper that is lower than 8 feet and cannot be removed, please send us photos of the gate so we can review the access.
Slopes & Stairs: If your property has steep grades, multiple stairs, or tiered landscaping, please let us know in advance.
Turns: Our wall sections are long; tight 90-degree turns around the side of a house may require extra space.
What if my path is narrow or difficult? If your pathway is restricted or features challenging terrain, please email us a few photos of the area. Our team will review them to verify if we can navigate the space or if special arrangements are needed for your build.
Why it matters: Providing a clear, accessible path allows our crew to transport your materials safely and efficiently, ensuring your "Shed in a Day" is completed right on schedule.
No, you do not need to be home. We have designed our process to be as convenient as possible. Our professional installers can complete the entire project while you are at work or away, provided we have the necessary information and access.
How we ensure accuracy: To make sure your shed is built exactly where and how you want it, we will send you a Pre-Installation Form before your scheduled date. This form is a critical step where you will:
Upload Photos: Provide clear photos of your driveway, the pathway to the build site, and the install site itself.
Specify Accessory Placement: Tell us exactly where you would like windows and other accessories placed.
Confirm the Door Location: We ask that you double-check your invoice to confirm the door location is correct, as our installers will follow the invoice specifications.
Coordinate Access: Provide information regarding gate codes or access to an outdoor electrical outlet for our tools.
To guide our team when they arrive, we ask you to prepare the site based on your floor type:
For Wooden Floors: Please stake out the four corners of the shed location and clearly mark which side you would like the door to face.
For Concrete Pad Foundations: You do not need to stake the corners, but we ask that you mark the pad to indicate which direction the door should face. You can use tape, chalk, or even a piece of paper that says "DOOR" weighted down with a rock.
How should I prepare the ground? You do not need to remove your grass, but we do require that it be cut short before our arrival. Additionally, any plants, small trees, or other vegetation within the shed's footprint must be cleared to ground level.
Sprinklers : The area beneath the shed must be completely clear of obstacles. Before our installation date, please ensure any underground sprinkler systems must be removed from the area where the shed is being built.
Managing Slopes & Uneven Ground: Our standard installation includes professional leveling. However, if your site has a slope of more than 8 inches, or if you have any concerns about the terrain:
Send us Photos: Please email us a few clear photos of the area and the pathway leading to it.
Free Assessment: We provide a visual assessment from these photos at no cost to ensure we can build your shed safely and correctly.
We offer island via barge installations if there is an appropriate barge. One way barge ride:
- 20 minutes or less for $400
- 21 minutes to 45 minutes for $500
- 46 minutes to 1 hour for $600
We do not offer island installs if the one way barge ride is over 1 hour long.
We will require you to email us photos of:
- where you’d like the shed constructed
- the barge
- the island landing
- the pathway from the landing to where the shed is to be built
The customer is responsible for organizing the barge and for the cost of the barge. We generally arrive for barge island installs around 7AM-8AM.
What is covered under my warranty? Every Shed in a Day installation includes a three-year structural warranty. This ensures your investment is protected and reflects our confidence in our craftsmanship.
Coverage Details: This warranty covers all primary structural components and operational hardware, including:
Framing: The integrity of the overall construction and base frame.
Doors: Proper alignment and operation of the shed doors.
Hardware: The durability of hinges and latches.
Construction: Any issues arising from the professional assembly of the shed.
Accessories: All Accessories include their original manufacturers warranty.
Our shed walls are constructed with a premium engineered wood product called LP SmartSide Panel. It is designed for exterior use on buildings and has a reverse board and batten finish.

The paneling is factory primed with a rustic and cross sewn texture featuring a weathered grain appearance of cedar.
Arrival Windows: Several variables, including loading times and travel, determine exactly when our crew will arrive at your property. We typically schedule two installations per day:
First Installation: Our crew generally arrives at 7:00 AM.
Second Installation: Depending on traffic and the completion time of the first build, the crew generally arrives between 10:00 AM and 1:00 PM.
How to check your slot: If you would like to know whether your project is the first or second installation of the day, please contact us the afternoon of the business day before your scheduled date.
Email: sales@shedinaday.com
Phone: 905-592-2040
Do I need to be there? As a reminder, you do not need to be home for the installation as long as your Pre-Installation Form is complete and your site is marked. Our installers will arrive, set up, and complete the build efficiently regardless of your assigned time slot.
Delivery Timing: Like our installations, DIY kit delivery times are influenced by loading schedules and travel variables. Your kit will be delivered at some point during your scheduled date but no specific time can be guaranteed.
How to check your delivery window: If you would like an estimate of when your kit will arrive, please contact us the afternoon of the business day before your delivery:
Email: sales@shedinaday.com
Phone: 905-592-2040
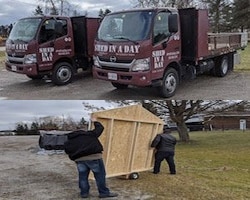
Where will the kit be placed? Your DIY kit will be unloaded neatly at the top of your driveway or wherever we are able to back our truck or trailer to.
* Please Note: Our drivers are unable to move kits to backyards, side yards, or secondary locations. Please ensure your driveway is clear and accessible on your scheduled delivery day.
Where can I pick up my kit? If you choose to pick up your DIY Shed Kit to save on delivery costs, you can do so at our workshop on your scheduled date.
Address: 3-62 Head St, Dundas, ON, L9H 3H7
Trailer Requirements: Because our kits are pre-built in large sections, you must arrive with the proper equipment to transport them safely:
Trailer Type: An open utility trailer is required.
Trailer Width: The trailer must be at least 8 feet wide.
Securing the Load: You must bring 4 to 6 heavy-duty cargo straps to secure the kit for transport.
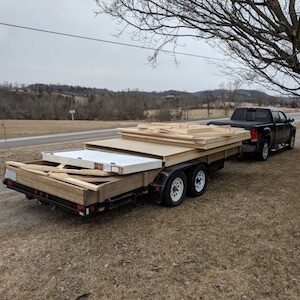
U-Haul Recommendations: If you do not own a trailer or yours is not large enough, U-Haul offers affordable rentals. Due to their specific dimensions, we recommend the 6’x12’ Utility Trailer.

Do I need a building permit? In most Ontario municipalities, sheds under 160 square feet (approx. 10' x 16') do not require a building permit. However, zoning bylaws regarding "setbacks" (how close the shed can be to a fence or property line) still apply. We recommend checking with your local building department to ensure your chosen location is compliant with local bylaws.